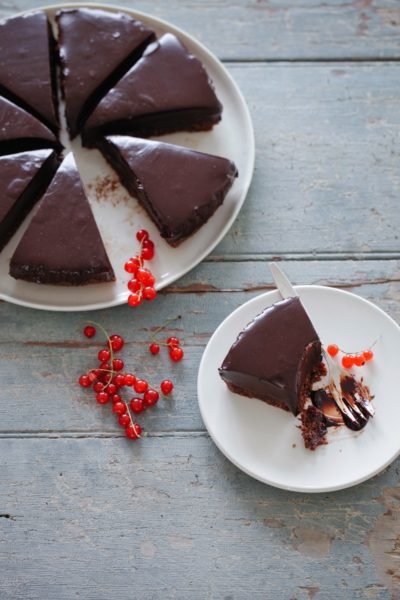
Strawberry Fraisier

Rhythm 108

Strawberry Fraisier
Prep Time: 10M
Cooking Time: 120M
Serves: 6

“To celebrate the start of the strawberry season here in Switzerland and RHYTHM 108’s BIRTHDAY we have put together this deliciously decadent fraisier cake. It is made with a light génoise sponge, sweet fresh strawberries and a creamy vanilla mousseline filling. It’s the perfect cake for a celebration on any day of the week!”

Bake Time : 10 minutes  
Total Prep Time : 2 hours plus chilling time 
Makes 1 large cake or 4 – 6 individual ones 
Recipe by : Daphne McMahon
Recipe Credit: Rhythm 108

There's more what this came from!

Ingredients

Ingredients for the génoise sponge
80 g rice flour
40 g polenta flour
40 tapioca starch
40 g ground almonds
120 g raw cane sugar
1 tsp baking powder
200 ml almond milk
80 g coconut oil, melted
2 tsp vanilla extract

Ingredients for the mousseline cream filling
600 ml plant milk (oat or almond work well in this recipe)
2 tsp vanilla extract
100 g icing sugar
30 g tapioca starch
2 tsp agar agar powder
200 g coconut oil room temperature

Ingredients for the filling and decoration
400 g fresh strawberries
125 g marzipan
Red food colouring

Ingredients for the sugar syrup
30 ml water
30 g sugar

“To celebrate the start of the strawberry season here in Switzerland and RHYTHM 108’s BIRTHDAY we have put together this deliciously decadent fraisier cake. It is made with a light génoise sponge, sweet fresh strawberries and a creamy vanilla mousseline filling. It’s the perfect cake for a celebration on any day of the week!”

Bake Time : 10 minutes  
Total Prep Time : 2 hours plus chilling time 
Makes 1 large cake or 4 – 6 individual ones 
Recipe by : Daphne McMahon
Recipe Credit: Rhythm 108

Method

Method for the génoise sponge

  1. Preheat the oven to 180° Celsius and line the bottom of two 20 cm round tins with baking paper. Grease the sides of the tin with a little coconut oil.
  2. Weigh out and sift all the dry ingredients into a medium sized bowl and mix them together.
  3. Melt the coconut oil and stir into the dry ingredients. Add the plant milk gradually, stirring after each addition so that it is well incorporated. Don’t overmix otherwise the mixture won’t rise as well during the bake.
  4. Divide the mixture equally between the two tins and bake on the middle shelf of the oven at 180° Celsius for 10 minutes. The edges of the sponge should start to colour slightly, but it will remain light in colour and soft but firm to the touch.
  5. Remove from the oven and place on a cooling rack in the tins to cool down completely.

Method for the mousseline cream filling

  1. Place the vanilla extract and plant milk in a saucepan and bring to the boil. Remove from the heat and leave to infuse for 30 minutes.
  2. In a separate bowl mix together the icing sugar, tapioca starch and agar agar. Add a few tablespoons of the milk to form a fluid paste and then whisk into the rest of the milk.
  3. Put back on the heat and bring to the boil, whisking continuously until thickened. Reduce the heat to a low simmer and cook for 2 – 3 minutes, whisking continuously.
  4. Take off the heat and pour it into a medium bowl. Cover with cling film to stop it forming a skin. Leave to one side and let cool to room temperature.
  5. Weigh out the coconut oil and whisk for a few minutes until soft and creamy.
  6. Once both the coconut oil and cooled milk mixture at roughly the same temperature, start to add them together gradually, whisking vigorously after each addition.
  7. The coconut oil must emulsify completely with the thickened milk mixture. This step is essential to achieve a smooth mousseline cream!
  8. It may separate as you mix it together but keep whisking vigorously and it will come together.
  9. Once homogenised, cover the bowl with cling film and place in the fridge for a few hours or overnight to cool completely and firm up.

Method for the sugar syrup

  1. In the meantime, prepare the sugar syrup by placing the water and sugar in a small saucepan.
  2. Bring to the boil and make sure the sugar is completely dissolved. Take of the heat and allow to cool before using.

Method for the marzipan

Take your block of marzipan and add a small drop of red food colouring to it and mix it in well so that it becomes totally uniform in colour. Wrap in cling film and leave to one side.

To assemble the cake

  1. To build the cake you will need a pastry ring 18 cm in diameter and 5 cm high.
  2. Take one of the sponge layers, which should be about 1 cm high. You may need to trim a few millimetres off the top of the sponge to flatten it out if it puffed up too much in the oven.
  3. Cut around the base layer of the sponge so that it is about 1.5 cm less in diameter than the pastry ring, for example, pastry ring is 18 cm, sponge layer needs to be 16.5 cm.
  4. Place the pastry ring on a flat plate or cake stand and line with acetate (if using).
  5. Remove the base of about 15 strawberries, making sure they are all roughly the same height and then cut them in half lengthways.
  6. Place them upright with the cut side pressed against the pastry ring all the way around. They need to be tightly packed together so the they hold the cream filling in nicely.
  7. Next, place the base sponge layer inside the ring of strawberries, it should fit flush against the strawberries (depending on the size of the strawberries you have!). Gently press the sponge down to fit against the strawberries and brush over half of the cooled sugar syrup.
  8. Then, start spreading the mousseline cream onto the sponge layer. Using a pastry knife spread the mousseline filling up the sides of the pastry ring, pressing quite hard to ensure the cream fills any gaps between the strawberries and sponge. The cream layer should be about 0.5 cm thick over the sponge and just a very thing layer over the strawberries.
  9. Cut most of the remaining strawberries into small chunks and scatter them over the mousseline cream. Place them in the middle only, leaving a 2 cm gap between the sides of the pastry ring and the chopped strawberries.
  10. Cover the chopped strawberries with a thin layer of mousseline cream, again pressing the cream up against the side to make sure all gaps are filled, and the strawberries are nicely packed in.
  11. This strawberry and cream layer should be about 1.5 cm thick. There should still be about 1.5 cm left between the layer of cream and the top of the pastry ring.
  12. Cut around the top layer of the sponge so that it is about 1 cm less in diameter than the pastry ring, for example, pastry ring is 18 cm, sponge layer needs to be 17 cm.
  13. Finally place the second layer of sponge on top and brush it with the remaining sugar syrup.
  14. Then spread the remaining mousseline cream on top, making sure to flatten and smooth it out equally over the sponge. It should be about 0.5cm thick and reach the very top of the pastry ring.
  15. Ideally leave the cake in the fridge overnight or at least a few hours to set, allowing the flavours to mellow and the sponge to absorb the syrup.
  16. Before serving the cake, roll out the marzipan to about 3mm thick and neatly cut out an 18 cm circle.
  17. Take the cake out of the fridge and carefully remove the pastry ring (if you haven’t used plastic acetate to line the pastry ring it’s a good idea to heat it slightly. You can do this by using a hairdryer for a few seconds around the circumference of the ring).
  18. Then place the marzipan circle on top of the cake and decorate as you like using fresh strawberries!
  19. This is best eaten fresh from the fridge – enjoy!

In need of more strawberry inspiration? Explore more of our vegan strawberry recipes.

Want more recipes like this?

Try vegan with Veganuary and we'll send you our celebrity cookbook, recipes, and much more - all for free!
One-Pot Meal Plan
Celebrity Cookbook
Delicious Recipes
31 Coaching Email